Getting Started with Waveu #
Welcome to Waveu! This guide will help you set up and run Waveu on your ESP32, allowing you to generate and visualize waveforms easily. Whether you’re a beginner or an experienced developer, you’ll find step-by-step instructions to get started quickly. By the end of this guide, you’ll be able to generate a sawtooth wave and visualize it on your oscilloscope, as shown in the figure below!
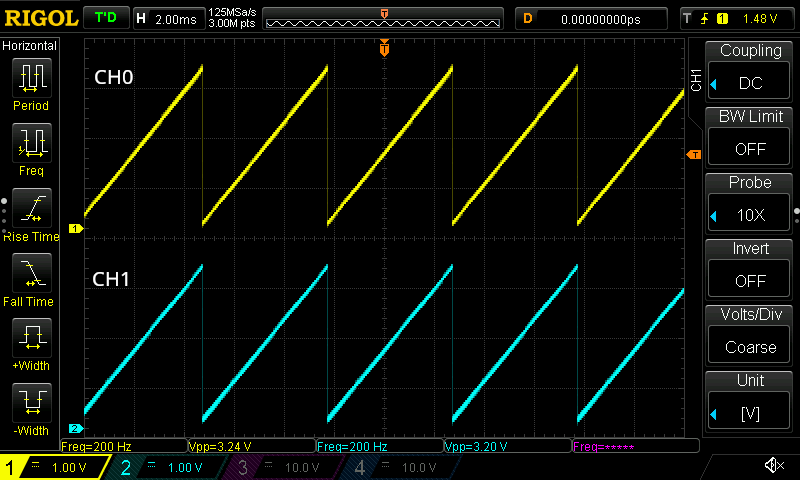
Figure: Sawtooth wave with a frequency of 200 Hz displayed on both channels: CH0 (top) and CH1 (bottom), generated as a result of completing this Getting Started guide.
1. Short Description #
Compile & Run on ESP32 #
Waveu’s example code on GitHub can be compiled and run on your ESP32. Simply connect the DAC pin to an oscilloscope, and you’re ready to generate diverse waveforms!
2. Step by Step Guide #
Waveu simplifies waveform generation with ESP32 by offering pre-configured examples. This guide will walk you through everything from setting up your hardware and software to visualizing waveforms on an oscilloscope. Even if you’re new to ESP32 or ESP-IDF, don’t worry—we’ve got you covered!
2.1 Hardware Requirements #
To use Waveu, you’ll need:
- ESP32 development board (for running software)
- PC and USB cable (for programming)
- Oscilloscope (to visualize waveform output)
2.2 Prerequisites on Software #
Before diving into Waveu, ensure you have:
Git installed
Install git, following the Downloads link at the git homepage.ESP-IDF setup
Install the ESP-IDF version 5.4 or later.Familiarity with DAC examples We recommend reviewing the ESP-IDF example: DAC Continuous Signal Generator.
– New to ESP-IDF? – #
If you’re new to ESP-IDF, here are some key concepts to help you get started:
What is ESP-IDF? ESP-IDF (Espressif IoT Development Framework) is an official development framework for ESP32, offering tools, libraries, and examples to program the chip. Think of it as the foundation for writing, building, and deploying your applications.
Why Use ESP-IDF? While Arduino IDE is simpler, ESP-IDF offers advanced features, better debugging tools, and fine-grained control of hardware components, making it ideal for more complex projects like Waveu.
Using VSCode with ESP-IDF For beginners, using the ESP-IDF extension in VSCode can simplify navigation, code editing, and flashing your ESP32. The extension integrates the ESP-IDF tools directly into VSCode.
Installing ESP-IDF Follow Espressif’s guide to set up ESP-IDF. Installation includes setting up the toolchain, build tools, and ESP-IDF itself. Don’t worry—it’s well-documented, and you’ll only need to do it once.
What is
menuconfig?menuconfigis a configuration tool for setting up project-specific options, such as selecting hardware peripherals and tuning parameters. When you runidf.py menuconfig, you’ll see a terminal-based menu interface where you can configure Waveu options.Common Commands
idf.py build: Compiles your project.idf.py flash: Uploads the compiled firmware to your ESP32.idf.py monitor: Opens a serial monitor to view logs from the ESP32.
2.3 Build, Flash & Visualize on Oscilloscope #
Clone the repository:
git clone https://github.com/tinyalg/waveu.gitChange to this directory:
cd waveu/examples/sawtoothAlternatively, open this directory in VSCode with the ESP-IDF extension for easier navigation and editing.
Run menuconfig:
In VSCode, open the ESP-IDF Terminal.
idf.py menuconfigIn
menuconfig, configure the following settings under[Component config > Waveu Configuration]:- Select active DAC channels:
- CH0 and CH1: Output to both channels.
- CH0 only: Output to DAC Channel 0.
- CH1 only: Output to DAC Channel 1.
- Select active DAC channels:
Flash the example:
idf.py build flashMonitor the output:
idf.py monitorYou should observe messages in the console confirming the start of waveform generation.
I (291) UserWaveConfig: Frequency=200.00
I (291) Waveu-ESP32Config: waveformDataOutputTask to on core 0 at priority 10.
I (291) Waveu: LEN_DATA_BUFFER=16000, SAMPLE_RATE=1000000, TIMER_PERIOD=16000
I (301) Waveu: Started waveformDataGenerationTask on core 1 at priority 5.
Connect your oscilloscope: Attach the oscilloscope to the DAC output channel as configured in
menuconfig.
– Troubleshooting – #
Even with proper setup, you might encounter some issues. Here are common problems and their solutions:
ESP32 not detected by your computer
- Solution: Ensure the USB cable supports data transfer (some cables are power-only). Try reconnecting or using a different USB port. Verify drivers are installed for your ESP32 board.
idf.pycommand not recognized- Cause: ESP-IDF environment variables might not be set up.
- Solution: Re-run the ESP-IDF setup script for your OS:
- On Windows: Run
install.batand thenexport.bat. - On Linux/macOS: Source the
export.shscript in your terminal.
- On Windows: Run
Compilation errors
- Cause: Missing or incompatible ESP-IDF version.
- Solution: Ensure you’re using ESP-IDF 5.4 or later and update if necessary.
Flashing issues
- Cause: Incorrect port or permissions.
- Solution: Use
idf.py flash -p <your_port>to specify the correct port. On Linux/macOS, ensure your user has permission to access the port (e.g., add your user to thedialoutgroup).
No waveform visible on oscilloscope
- Cause: Incorrect DAC channel configuration or wiring.
- Solution: Double-check your
menuconfigsettings for active DAC channels and ensure the correct pins are connected to your oscilloscope.
Garbage output on serial monitor
- Cause: Incorrect baud rate.
- Solution: Confirm that the monitor’s baud rate matches the project’s settings in
menuconfig(default is 115200).